Page 2
Open your image in PSP. Duplicate the image ("Shift"..."D") and close the
original image. Increase color depth to 16 million colors.
("Colors"..."Increase Color Depth"...16 million colors 24 bit)
Save as a PSP file.
Promote image to layer. ("Layers"..."Promote to Layer")
Apply Mac's "Remove White" filter. ("Effects"..."Plug-in
Filters"..."Mac's"..."Remove White")
**NOTE** If your image turns black at this point, you skipped the "promoting to
layer" step. Pay attention now. ~L~
Use your magic wand with these settings:
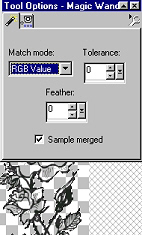
Click anywhere outside the image. Invert the selection.
("Selections"..."Invert") Now, the rose border should have marching ants all
around it. Contract your selection by "1."
("Selections"..."Modify"..."Contract"..."1")
*Add a new raster layer.*
Drag this layer below Layer 1 in your layers palette.
Here is the color palette I used for this stamped image. Feel free to download
it to your hard drive and use it for reference as we color our stamp.

In both rows, the first colors on the left are our base colors, the middle
colors are our shading colors and the right colors are our highlight colors.
Use your color picker tool to make your foreground color the first pink to the
left. Make sure Layer 2 is highlighted. Use your magnifying glass tool to zoom
in on your image 2 or 3 times. "Paint" your roses with your paintbrush tool
using these settings:
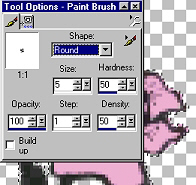
The selection will prevent your painting outside the lines on most of the image.
Be careful in areas that are not selected, though. If you make a mistake, simply
"undo." ("Ctrl"..."Z")
Keep your image selected and
*Add a new raster layer.*
Pick your middle shade of pink for some shading. Use your airbrush tool with
these settings:
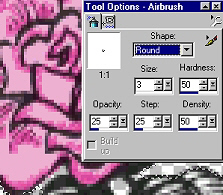
to spray all around the areas that look shaded by the stamp outline and I
sprayed the edges of my rose petals. When you have shaded all of the roses, use
a gaussian blur on this layer with these settings:
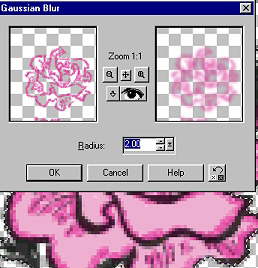
I always view my image normal sized at this point, and if I think I need to add
more shading, I simply undo the gaussian blur, add more shading, then redo the
gaussian blur.
*Add a new raster layer.*
Set your foreground color to the lighter pink, add highlights on your roses
using the same settings on your airbrush, then use the same gaussian blur on
this layer. Just highlight where it naturally looks like a highlight should be.
It's not an exact thing; but you do want your base color and shading to show
through. If you find that you have too many highlights or not enough, simply
undo and redo.
Home
Follow wompie!